
TUT~She talks to Butterflies

This
tutorial was written May 3, 2020, © InkkFreakk.
My
tutorials were registered at TWI before they closed
The
author assumes you have some basic working knowledge of Paint shop Pro and
Animation Shop.
Any
similarity to other tutorials is unintentional.
Original
tutorial Written in Paint shop Pro X9
I
should work for other versions as well with minor adjustments.
If
at any time you feel you know your PSP well enough to alter steps
to
achieve the same thing feel free to do so.
After all, tutorials are only guidelines.
You
should always try to deviate from the tutorial and make your creation different
while
still learning the methods and techniques.
Programs needed
Paint
shop Pro
Animation
Shop
Font
of your choice
Tube
of choice
Scrapkit
of your choice
Plugins Needed ( also
called filters )
Xero>Fritillary
AlienSkin>Xenofex
2
L0kas
Software>Aqua [used on my font in default settings]
VM
Extravaganza
I.C.NET
software - Filters Unlimited 2.0 with VM Extravaganza [Transmission] imported
into it
Other items
Henri
Peter is a FTU Artist [please check thezonegroups.com]
You
can use any tube you wish.
ScrapKit
used…. “As Time Goes By” by Kolor’Scapez! Kreated
I
used the fonts called Garden Signboard & Lemon Torte Solid
Supplies used but Not Provided
WSL_Mask363
Please
read through the tutorial before you begin.
My tutorials can be long so take your time.
I
want to teach you something other than copy and pasting, but in some instances
you will do just that at some point.
Tips are shown in red throughout the tutorial.
If
you have any issues with my tutorials or suggestions feel free to contact me
through my blog.
***TIP***
Remember to save your
image after each step
Step 1
=============================
Open a new
image about 550 x 550 – transparent
Save your
file. Rename it whatever you wish.
Open your
tube image
Click the
tube layer on the layer palette and drag it
to your
working image
Activate
working image if it isn’t already
Resize tube to
75%
Top menu
adjust>sharpness>sharpen
Rename this layer
TUBE
Click and
drag frame 1 into your working image
The frame
WILL NOT SHOW, but you will now have raster layers 1 and 2
Activate
raster layer 2
Top
Menu>Image>Resize by 50%
Move frame below
your tube layer
Sharpen and
move to where it just touches the bottom flat edge of your tube
Adjust>Hue
and Saturation>Colorize
Settings
shown below – click ok
Rename this
layer FRAME 1

***TIP***
Remember to save your image after each step
Step 2
=============================
Activate
your working image
Select FRAME
1 layer
Top
menu>selections>select all>float>defloat
Top
menu>selections>modify>expand by 12
Do not
deselect
Open paper 9
Top
menu>edit>copy
Activate
working image
New raster
layer below FRAME 1 layer
Top
menu>edit>paste into selection
Deselect
Rotate frame
as shown in my example, degree doesn’t matter; it’s whatever you like…
Top menu
adjust>sharpness>sharpen
Rename this
layer FRAME 2
***TIP***
Remember to save your image after each step
Step 3
Create new
raster layer, move to bottom by clicking it in the layer palette and dragging
it down
Create another
new raster layer directly above FRAME 2 layer
Activate FRAME
2 layer you just created
Top
menu>selections>select all>float>defloat
Top
menu>selections>modify>contract by 20
Do not
deselect
Activate the
empty layer you created above the FRAME 2 layer
Open paper
13
Edit>copy
Paste into
selection
Deselect
Rotate this
layer a touch like the last one [see my example]
Top menu
adjust>sharpness>sharpen
Rename this
FRAME 3 layer
Add a drop shadow
to all 4 layers of 0 – 0 – 100 – 11.00 – black
***TIP***
Remember to save your image after each step
Step 4
=============================
Activate FRAME
1 layer
Top menu>Image>Resize>95%
Resample
using>smartsize
Lock aspect
ratio - CHECKED
Resize all
layers - UNCHECKED
Top menu
adjust>sharpness>sharpen
Then repeat
resize and sharpen on the other two frame layers
***TIP***
Remember to save your image after each step
STEP 5
=============================
Open paper
14, make sure it is the active image
Top Menu>Copy
Activate
bottom layer of your working image and make sure it is an empty layer
If not,
create one and move to bottom
Top Menu>Selections>Select
all
Top Menu>Edit>Paste
into selection
Deselect
Top
Menu>Layers>Load mask from disk
Apply
WSL_Mask363
Fit
to canvas – source luminance - hide all mask ALL CHECKED
Click
load
Activate
mask-raster layer>delete>merge group
Top Menu>Adjust>Sharpness>Sharpen
***TIP***
Remember to save your image after each step
Step 6
=============================
Activate
top FRAME 1 layer
Top
Menu>Selections>Select all>Modify>Contract by 20
Right
click your frame layer and promote selection to layer
Deselect
Activate
promoted layer
Top
Menu>Effects>Xero>Fritillary

***TIP***
Remember to save your image after each step
Step 7
=============================
Top
Menu>Effects> Filters Unlimited 2.0 with VM Extravaganza [Transmission]
imported into it
Mine
when imported is at the top

Click
apply
It
will add a small white halo around it
***TIP***
Remember to save your image after each step
Step 8
=============================
Top
menu>Effects>Plugins>AlienSkin Xenofex 2>Constellation
Apply
with settings as shown below
Then…
Top
Menu>Adjust>Sharpness>Sharpen
Then…
Duplicate
layer 1 time

***TIP***
Remember to save your image after each step
Step 9
=============================
Still
on your promoted layer of step 8…
Top
menu>Image>Rotate>Free Rotate
Direction>Left
Degrees>Free>5.00
All
layers & Rotate around center UNCHECKED
Top
menu>Adjust>Sharpness>Sharpen
***TIP***
Remember to save your image after each step
Step 10
=============================
Activate
tube layer [should be top layer]
Duplicate
and drag that layer below FRAME 1 layer
Activate
that layer if it is not
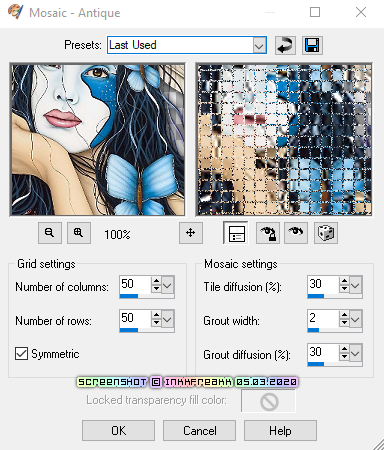
Top
menu>Effects>Texture Effects>Mosaic Antique
With
the settings shown below in the screenshot
Click
ok
Drag
this layer a bit to the left and down so you can see it as in my example above
Top
menu>Adjust>Sharpness>Sharpen
***TIP***
Remember to save your image after each step
Step 11
=============================
Create
and activate a new raster layer above FRAME 1
Material
Palette>Foreground #072c45>Background Null
Tool
Menu>Rectangle Tool>Create on Vector>Line Style>Dash Dot
Dot>Width 3.00
Draw
a square around your FRAME 1 layer larger than the frame
Convert
to raster
Rotate,
move and even it out until it is where you want it, see example
Add
drop shadow with same settings as in Step 3
Duplicate
this layer
Top
menu>Image>Rotate>Free Rotate
Direction>Left
Degrees>Free>5.00
All
layers & Rotate around center UNCHECKED
Top
menu>Adjust>Sharpness>Sharpen
***TIP***
Remember to save your image after each step
Step 12
=============================
Activate
top layer
Create
whatever word art you want, or copy my example
I
created mine with the following…
Garden
Signboard font
Materials
palette>foreground #c5dff3 - background #3d99dd
Click
foreground>Gradient>#01 Foreground-Background
Angle
51 - Repeat 1 - Invert Checked
Click
ok
Right
click background - left click first little square in the popup box - make
foreground null
Font
tool>Size 36 – kerning 75 – foreground null – anti-alias smooth
Once
placed where I wanted it, I converted to raster
Top
menu>selections>select all>modify>expand by 2
Create
new raster layer below word art
Flood
fill with a silver gradient>any angle you like
Deselect
Activate
silver layer
Top
Menu>Adjust>Add/remove noise>Add noise>Random>Monochrome
checked>75%
Top
Menu>Effects>Drop shadow>0 – 0 – 100 – 7.00 - black
Activate
blue word art layer
Apply
L0kas Aqua in default settings
Merge
the top two word art layers down
***TIP***
Remember to save your image after each step
Step 13
=============================
Now
is the time to add your little tidbits from the scrap kit
Add
whatever you want, wherever, make it yours…
My
“name” font is Lemon Torte Solid
Size
48 - #072c45 – Kerning 0 – Smooth
Add
your copyright layer, save as a png
Remember
to save as pspimage file too
AND
YOU ARE DONE!!!
Subscribe to:
Posts
(Atom)


0 comments:
Post a Comment