
TUT~Glow Pots

This tutorial was written March 14, 2009, by InkkFreakk.
My tutorials are registered at TWI
The author assumes you have some basic working knowledge of Paint shop Pro and Animation Shop.
Any similarity to other tutorials is unintentional.
Written in Paint shop Pro X1 but will work for other versions as well with minor adjustments.
If at any time you feel you know your psp well enough to alter steps to achieve the same thing feel free to do so.
After all, tutorials are only guidelines. You should always try to deviate from the tutorial and make your creation different while still learning the methods and techniques.
Programs needed
Paint shop Pro
Animation Shop
A Font of your choice
A tube/image of choice
Plugins Needed ( also called filters )
NONE
Other items
I have chosen an image from InkkStormArts
You can purchase this image by contacting me, until i get my website back up.
Glitter tile was found at MotzGraphics [site gone]
I used the one titled—Spiral 3 in silver
Scrap Kit used….none
====================
Supplies provided
NONE
Please read through the tutorial before you begin.
My tutorials can be long so take your time.
I want to teach you something other than copy and pasting, but in some instances you will do just that before the fun steps.
Tips are shown in BLUE throughout the tutorial.
If you have any issues with my tutorials or suggestions feel free to contact me through my blog.
***TIP***
Remember to save your image after each step
Step 1
Create a new image 500 x 500
Flood fill with white
Step 2
===================
Preset shapes tool-rounded rectangle-width 12-line style-solid-background null- in any color you choose
I used the metallic silver gradient that comes with PSP X1
Click anywhere and drag until your lower numbers say 450 x 450 like shown in example image
I drew mine about 450 x 450
Watch the little numbers below to size it correctly
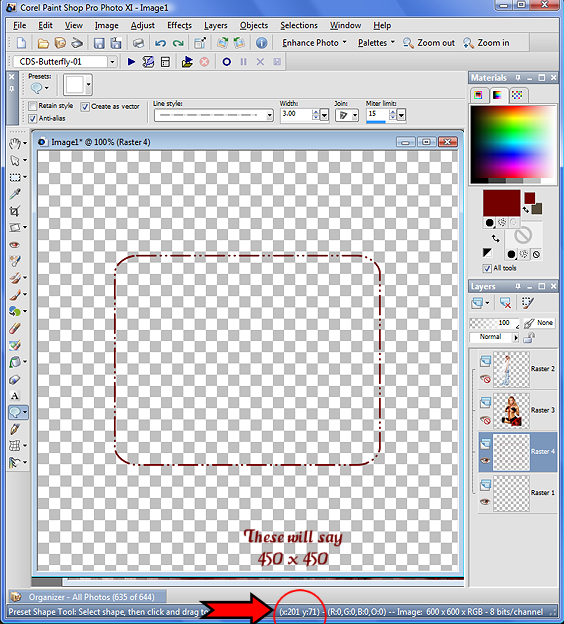
Objects-align-center in canvas
Convert to a raster layer
***TIP***
Remember to save your image after each step
Step 3
=============================
Activate the solid box layer
TOOLBAR-MAGIC WAND-click inside the box,
SELECTIONS-MODIFY-EXPAND-6.
Create a new layer below the box layer
Copy and paste your image into the box
***TIP***
Remember to save your image after each step
Step 4
Activate your sliver square layer
MENUBAR-SELECTIONS-SELECT ALL-FLOAT-DEFLOAT
MENUBAR-SELECTIONS-MODIFY-CONTRACT-6
Promote selection to layer
DESELECT
Activate your promoted layer
MENUBAR-ADJUST-ADD/REMOVE NOISE-GAUSSIAN-MONOCHROME-100%
Apply drop shadow of
Apply a drop shadow of 0/0/100/12.00/black
Activate your sliver square layer
Apply a drop shadow of 0/0/100/12.00/black
Merge the silver frame layers together to make one layer
This should be the top layer
MENUBAR-SELECTIONS-MODIFY-EXPAND-12
DO NOT DESELECT!
***TIP***
Remember to save your image after each step
Step 5
Now we will add the animated glitter tile
You will need to open the tile in animation shop
MENUBAR-EDIT-SELECT ALL
MENUBAR-EDIT-COPY
Minimize animation shop
Go to PSP
Right click anywhere in the grey working area
Paste as a new image
PLEASE READ THE NEXT STEPS CAREFULLY!!!
***TIP***
Remember to save your image after each step
STEP 6
PLEASE READ THIS STEP CAREFULLY!!!
When the glitter tile is taken to PSP it will create one file with 8 layers
You need each of these layers individual
Click and drag each layer to the grey work area and it will create a new image
Do this with all 8 layers then close your original glitter tile
Make sure to keep them separate
***TIP***
WHEN YOU CLICK AND DRAG EACH ONE IT WILL OVERLAP THE OTHERS IN THE UPPER LEFT OF THE WORK AREA
IN ORDER TO KEEP THE ORIGINAL FILE SEPARATE MAKE SURE TO HAVE IT DOWN IN THE BOTTOM OF THE WORK AREA!!!!
Step 7
PLEASE READ THIS STEP CAREFULLY!!!
Now you will need to create 8 empty raster layers below your silver frame layer and above the image layer
Open your MATERIAL PALETTE from the foreground box
Choose Pattern
You will see the 8 glitter tiles there
Choose the first one
YOU WILL NEED TO DO THESE IN ORDER…VERY IMPORTANT OR THE ANIMATION WONT WORK
Now you will activate the bottom empty raster layer
Paste the glitter tile into the selection
Now hide this layer
Activate the next one
Go to the materials palette, choose the next animation tile
Paste into the selection area in the empty layer
Repeat this process for all 8 layers
***TIP***
YOU CAN DELETE EACH ANIMATION TILE AS YOU USE IT, THEY WIL BE SMALL SO SEEING THE NAME WILL BE DIFFICULT UNLESS YOU ENLARGE THEN IN YOUR WORK AREA.
MAKE SURE TO KEEP TRACK OF THE NAMES OF THE TILES IN THE MATERIALS PALETTE
THEY WILL BE NAMED IMAGE (#)
START WITH THE FIRST ONE IN THE PALETTE.
Once you have all 8 animation layers done you will want to check them in animation shop to make sure they are correct
If they aren’t then you will need to delete the 8 layers you created and start over.
TO CHECK THE ANIMATION—
Hide all layers in your tag but the 8 glitter layers
Save as a pspimage file
Open it in animation shop
VIEW-ANIMATION
If it flows like on the site you got it from then your good to go on
Close the image and go back to psp
***TIP***
Remember to save your image after each step
Step 8
Now you will need to duplicate the image, white, and silver frame layers until you have 8 of each
Hide all but the bottom one of each set
MERGE VISIBLE
Hide this merged layer
Unhide the next ones in line
MERGE VISIBLE
Hide this merged layer
Repeat for all 8 sets of layers
Once you have this done save your tag again with a different name
Test it in animation shop again as you did above
If its right close the image and go back to animation shop to finish your tag
***TIP***
Remember to save your image after each step
Step 9
Activate the top layer
Now add your copyright and watermark layers
Merge them and duplicate it until you have 8
Merge as you did before doing one of the text layer and the tag layer
***TIP***
Remember to save your image after each step
Step 10
Now do your text layer and duplicate it until you have 8
Merge these like above
Save your image, then take it to animation shop and save it as a gif
***TIP***
Remember to save your image after each step
Subscribe to:
Posts
(Atom)


0 comments:
Post a Comment