TUT ~ Bars and Bubbles

This tutorial was originally written June 30,
2008, by InkkFreakk.
Tutorial we re-written October 04, 2018 by
InkkfFreakk
The author assumes you have some basic working
knowledge of Paint shop Pro and Animation Shop.
Any similarity to other tutorials is
unintentional.
Original tutorial Written in Paint shop Pro X1
Re-written version done in PSP X9
but will work for other versions as well with
minor adjustments.
If at any time you feel you know your PSP well
enough to alter steps to achieve the same thing feel free to do so.
After all, tutorials are only guidelines.
You should always try to deviate from the
tutorial and make your creation different while still learning the methods and
techniques.
Programs
needed
Paint shop Pro
Jasc Animation Shop
Plugins
Needed ( also called filters )
DSBFlux - bubbles
AlienSkin Xenofex 2 - Constellation
Other
items
A Font of your choice
A tube of choice
I am using an awesome Fractal © InkkFreakk
This artwork was created by InkkFreakk
You can use other photos if you wish.
=================
“Sweet Mutterings” Scrap kit designed
by Kolor’Scapez! Scrapz
This kit will be available again in the
near future.
====================
NO SUPPLIES PROVIDED FOR THIS TUTORIAL
Please read through the tutorial before you
begin.
My
tutorials can be long so take your time.
I want to teach you something other than copy
and pasting, but in some instances you will do just that before the fun steps.
Tips
are shown in red throughout the tutorial.
If you have any issues with my tutorials or
suggestions feel free to contact me through my blog.
***TIP***
Remember
to save your image after each step
It
is always a good idea to keep your folders open for…
Tag
save files
Scrap
kits
Images
I
always have at least 5 folders in my taskbar ready to access
I
do not close them until I am completely done
Step
1
===================
Open a new image that is 600 x 600
We will be reducing it later so pay no mind to
its large size at the moment.
Flood fill raster layer with white
Rename that layer “white”
Open your photo and drag it into your new image
from the layer box
Center it in your work area
It is a good idea if it is about 75% the size of
your working area
Rename that layer “image”
Duplicate this layer, rename “bubbles”
Duplicate again, rename it “blur”
then adjust\blur\gaussian blur\15
Click ok
Drag your layers so they are in this order from
top to bottom
Image
Blur
Bubbles
White
***TIP***
Remember
to save your image after each step
Step
2
Activate your image layer
TOOLBAR
– selection tool
Rectangle
Add/shift
Feather-0
Antialias-checked
Draw a set of tall rectangles similar to what is
in my example.
About the same height as the image, as wide as
you like, I did 7
They do not have to be evenly spaced,
After all this is supposed to be handmade and
unique…
Once you have made all your selection rectangles
Selections
- invert
Then you will and press the delete key.
This will remove any parts of the image outside
and between the selections you made.
Selections
- invert
DO
NOT DESELECT YET
***TIP***
Remember
to save your image after each step
Step
3
Activate the blur layer
New raster layer
Rename this layer white outline
MENU
– selections/modify/expand by 2
Flood fill your selections on this layer with
white
Activate blur layer
New raster layer
Rename this layer black outline
MENU
– selections/modify/expand by 2
Flood fill your selections on this layer with
black
Selections – select none
At this point you should have these layers in
this order from top to bottom
Image
White outline
Black outline
Blur
Bubbles
white
***TIP***
Remember
to save your image after each step
Step
4
Activate bubbles layer
MENU – effects/plugins/dsb flux/bubbles
Bubbles – 50
Density – 50
Frequency – 50
Tune – 50
Click ok
***TIP***
Remember
to save your image after each step
STEP
5
Before doing this step, you want your two layers
larger than your image layer,
Bubbles layer needs to be larger than blur
You may need to play with percentage to achieve
this
activate the blur layer
MENU
– image/resize/
UNCHECK ALL LAYERS
Pixel dimensions 80%
Click ok
activate the bubbles layer
MENU
– image/resize/
UNCHECK ALL LAYERS
Pixel dimensions 80%
Click ok
***TIP***
Remember
to save your image after each step
Step
6
Activate the “image” layer
Add what elements you wish from your scrap kit
You will arrange them ON TOP of the “image layer
For the elements that are behind the bubbles
layer
You can add elements below your blur layer too,
like mine
Add drop shadows if desired
I usually use…
Effects – 3d effects – drop shadow
Offset vertical – 0
Horizontal – 0
Attributes opacity – 100
Blur – 12
Color – black
Shadow on new layer – unchecked
I drop shadow all of my elements
Rename all of your element layers Element #
Change the number for each layer
starting with the first layer above the image
layer
***TIP***
Remember
to save your image after each step
Step
7
We will add your copyright layer now
Place it in a place that is easily seen, but not
obscuring your image
See example for suggested placement
Copyright layer should always be ABOVE all other layers
Activate your top layer
Text
tool – create as vector – center alignment
antialias off
color black
Pixelette font, size 8 [PSP X1 and higher],
Note***for PSP 9. You will have to use size 6
Materials
Palette - foreground and stroke layer turned off
Place your cursor somewhere in the white area
It is easier to see while you do this layer
Type your copyright and tagger line
If you wish to rotate your copyright so it sits
along the side of your tag like mine
MENU
–
image – rotate – free rotate – left – degrees 90
All layers unchecked – rotate on single layer
unchecked
Click ok
Drag to where you want it
Convert to raster
Menu
–
Selections – select all – float
Menu
–
Selections – defloat
Menu
–
Selections – modify – expand – 1
Click ok
Activate 2nd layer down
Create new raster layer
Rename white copy fill
Flood fill white
MENU
–
selections – select none
Activate top layer, merge down
***TIP***
Remember
to save your image after each step
Step
8
Hide all layers except the ones ABOVE the image layer
Merge visible everything ABOVE the image layer
Your layer palette should look like this

Rename merged layers to “accents”
Hide all layers but the image, white out line,
and black outline layers
Merge visible these three layers together
Rename to “image”
Hide this layer
Unhide any below this layer
Now merge visible all layers that were below the
outlines and image layers
Rename this “back”
Now you should have three layers in this order
from top to bottom
Accents
Image
Back
Activate “back” layer
Duplicate back 2 times, rename back 1 and back 2
Hide the top 2
Activate “image” layer
Duplicate image 2 times, rename image 1 and
image 2
Hide the top two
Activate “accents” layer
Duplicate image 2 times, rename “accents” 1 and
“accents” 2
Hide the top two
Now you will have these layers
*Accents 2
*Accents 1
Accents
*Image 2
*Image 1
Image
*Back 2
*Back 1
Back
The layers with an * are to be hidden
***TIP***
Remember
to save your image after each step
Step
9
Activate the “image” layer
MENU
–
effects/plugins/alienskin xenofex 2/constellation
Star size – 2.06
Size variation – 100
Edge star density – 100
Overall star density – 0
Overdrive – 100
Twinkle amount – 100
Keep original image – checked
Random seed – 1
Click ok
Hide this layer and unhide “image ”
MENU
–
effects/plugins/alienskin xenofex 2/constellation
Star size – 2.06
Size variation – 100
Edge star density – 100
Overall star density – 0
Overdrive – 100
Twinkle amount – 100
Keep original image – checked
Random seed – 3140
Click ok
Hide this layer and unhide “image 2”
MENU
–
effects/plugins/alienskin xenofex 2/constellation
Star size – 2.06
Size variation – 100
Edge star density – 100
Overall star density – 0
Overdrive – 100
Twinkle amount – 100
Keep original image – checked
Random seed – 4185
Click ok
Hide this layer again
And unhide the “image” layer
So now the layers that are unhidden are
Accents
Image
Back
***TIP***
Remember
to save your image after each step
Step 10
At this point I will activate the top layer
And create ONE name VECTOR layer
Activate “layer 3”
TEXT
TOOL
Add your name the way you like
[do
not convert to raster]
You will add effects to the name layer in a later step
***TIP***
Remember
to save your image after each step
Step 11
Time to save your file a second time with a
different name,
You should do this to preserve the original for
any future use and changes
FILE
–
save copy as
Bottom
of box – options button
LZ77 compression
Save
as:
PSP 7 compatible file
Click ok
Change file name to add the word merged
Click save
Here is an example of my file name
Original
file name -
bars-n-bubbles-remake-inkk18.pspimage
Secondary
file name – bars-n-bubbles-remake-merged-inkk18
***TIP***
Remember
to save your image after each step
Step
12
FILE
–
save
Close this file
Open the one with merged in the name
The “merged” renamed file is the one I will
continue the name layer and add effects and merge all layers. That will follow in the steps below
***TIP***
Remember
to save your image after each step
Step
13
Only
do this step if you feel you need to
CROP
TOOL
Click and drag around your image where you wish
to crop it to.
Double click in the center of your image and it
will crop
If you don’t like it
EDIT
–
Undo
Then redo it again
If you do not need to crop it, move on to the
next step
***TIP***
Remember
to save your image after each step
Step
14
Hide all layers except
Accents
image
Back
Now merge visible by clicking the “back” layer
[it will stay at the bottom]
Rename “layer 1”
Hide “layer 1”
unhide
Accents 1
Image 1
Back 1
Now merge visible, by clicking the back 1 layer
Rename “layer 2”
Hide “layer 2”
Unhide
unhide
Accents 2
Image 2
Back 2
Now merge visible, by clicking the back 2 layer
Rename “layer 3”
Unhide all 3 layers
You should have these layers in order from top
to bottom
Layer 3
Layer 2
Layer 1
Each layer should look exactly the same except
the constellation will move
***TIP***
Remember
to save your image after each step
Step
15
Activate “layer 3”
TEXT
TOOL
Add your name the way you like
Add any color/patterns, Stroke colors you wish to this layer
DO
NOT CONVERT TO RASTER
Duplicate layer
Hide bottom vector layer
Move hidden layer to the very the bottom
Leave the second one at the very top
***TIP***
Remember
to save your image after each step
Step
16
Reopen your original file, keeping the one you are
working in, open too
In the image you have been working in, click the
name vector layer and drag it to the image you just opened
It will go to the center of the image and you
can change I around later.
Save that original file you dragged the name
layer to and close it
Go back to the image you have been working in
***TIP***
Remember
to save your image after each step
Step
17
***For
my effects***
Leave text box open [lower versions of PSP
Higher versions you highlight the word
Open the original image you used in the
beginning
Minimize it in PSP
MATERIALS
PALETTE – foreground and stroke properties - white
MENU
SETTINGS – Stroke 1
MATERIALS
PALETTE – Left click the background and fill properties
box
Click pattern
Click down arrow to the immediate right of the
image it shows
Your image should be the first one
Choose your image
Angle – 0
Scale – 50%
Texture – unchecked
If you don’t like the way it looks, go back and
change the 50% to 40%
I chose 40%
Click apply in the text box [if you have one]
Convert to raster
Now apply your effects
***Here are mine***
Alien skin Eye candy 5: Impact – Glass
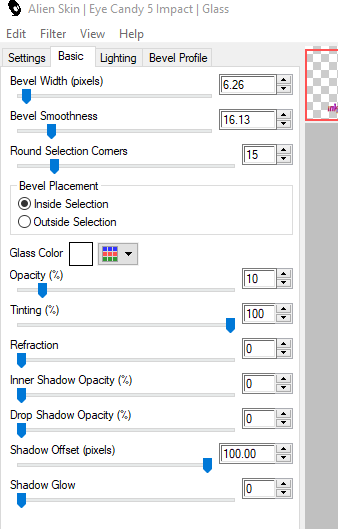
Then I used Alien Skin Xenofex 2 – Constellation

Apply drop shadow with any settings you prefer.
***Mine were***
Effects – 3d effects – drop shadow
Offset vertical – 3
Horizontal – 3
Attributes opacity – 100
Blur – 12
Color – black
Shadow on new layer – unchecked
I apply these settings 2x
***TIP***
Remember
to save your image after each step
Step
18
Duplicate your name layer 2 more times
Drag each name layer to a position above each
image layer
That bottom hidden layer is there for future use
in case you wish to change your name layer, leave it there it won’t affect
anything because its hidden…

Now hide all layers except the top two
Merge visible
Rename it “layer 1”
Hide that layer
Unhide the next two
Merge visible
Rename it “layer 2”
Hide that layer
Unhide the next two
Merge visible
Rename it “layer 3”
Unhide the top three layers
Now you should have 4 layers total
Leave that bottom one hidden and there
Save your file
Minimize PSP
***TIP***
Remember
to save your image after each step
Step
19
Now we will take our image to animation shop, so
open that program
To make sure you did the animation steps
correctly
Top MENU – view – animation
If it looks like my sample tag at the top, you
did it!!
Let’s save so you can use your new gorgeous tag!
FILE – save as
Give your file a name
(I use the same name as the original file, but I
take out the word merged and add my name and a dash to the front of it)
So here my save file name for my animated tag
would be
Inkkfreakk-bars-n-bubbles-remake-inkk18.gif
direct it to the folder where you wish to save
the file
click save
click next 3 times
click finish
close out of animation shop
ANNNDDD….
YOU ARE DONE!!!
I would love to see any results you have made
from my tutorial
You can send them to me at
Inkkfreakk @ gmail.com
I hope you enjoyed my tutorial
If you have any problems with it please email me
and let me know.
***Original
tag credits***
Shown below
You can use other photos if you wish.
=================
“All Cracked Up” Scrap kit designed by
BitterSweet Designs
Formerly known as Amber Rose Designs
2008
This kit is no longer available.
She is listed under the name
BitterSweet Designs

Subscribe to:
Posts
(Atom)